
Generating visuals that engage the audience is something aspired by every photographer, graphic artist, web designer, or other creative professionals. Photoshop makes this job easier with professional-level editing choices that it provides.
Photoshop allows one to build sumptuous images, websites, and graphics using image editing prospects, effects, retouching, and much more.
Table of Contents
Whether it is a 3D object or a plain background, the texture is an important component. The texture is known to bring vibrancy and life to the images. Without the correct texture, images look dull and uninspiring to the viewers. To get the perfect texture, you will have to pay close attention to the color depth, tone, and shape of the surface concerned. Sometimes you have to repeat a texture to fill the background. Hiding the joining points is a major task when trying to get the perfect texture. Photoshop lets you play around with many different effects till you get a seamless texture for your image or background.
To make this process an easier one, here are a few simple steps that you can follow to make a seamless texture using Photoshop.
Take A Close Look At The Image
This is the very first step when trying to edit a picture. Taking a closer look at the picture will reveal the areas having contrast or color different when compared to the other areas. If you find any such region, it is best to trim that part off.
Crop To Fit The Window
After you have chosen the texture and trimmed off the unwanted regions, you need to crop the image to fit it in the Photoshop Window. Without this step, the image may be dangling off the canvas which we do not want.
It is suggested that you use a cropping tool that will not delete and of the image pixels. Now choose “Select All” and create a new layer out of it. This new layer will now be limited by the dimensions of the window.
Texture Offset
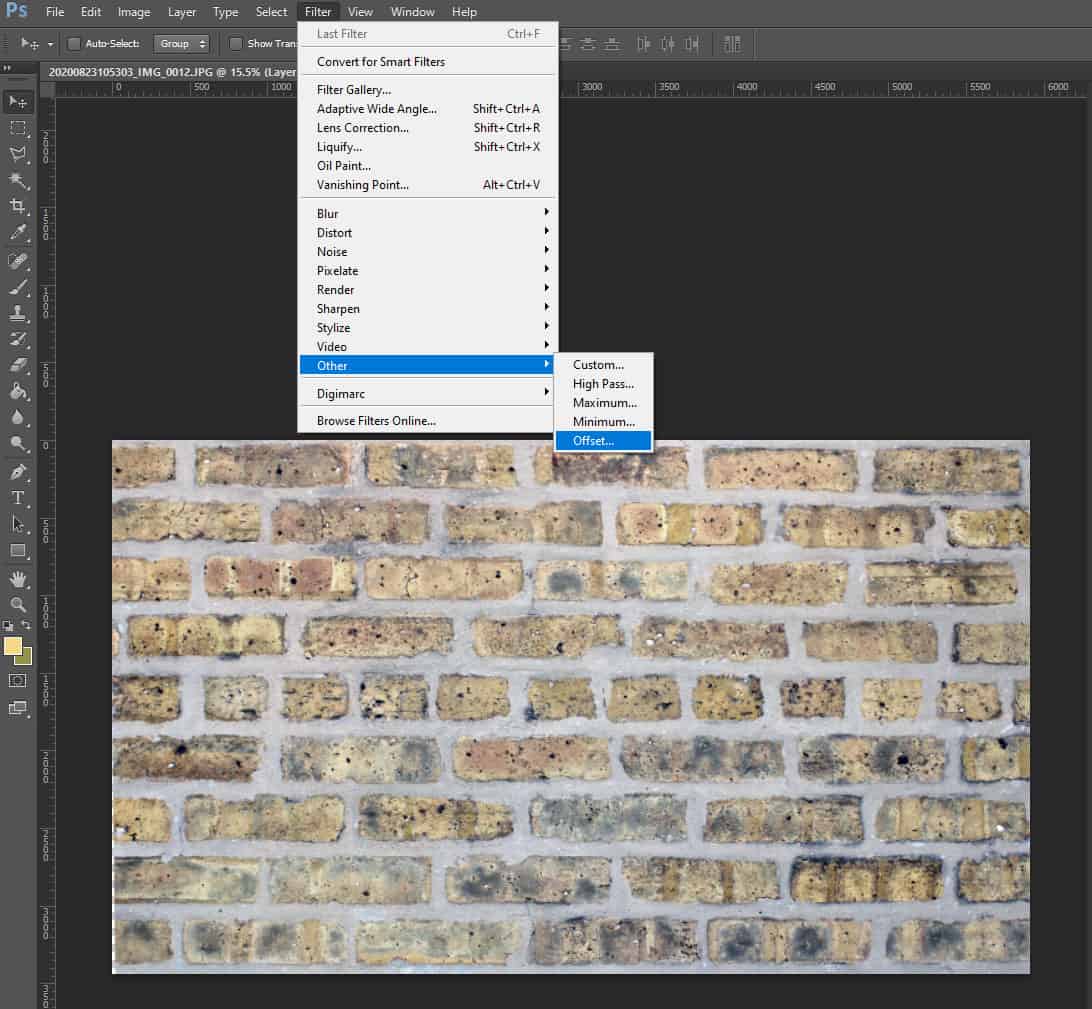
The primary complication towards obtaining a seamless texture are the points where the edges meet one another. This creates unwanted horizontal and vertical lines visible on the image. Photoshop lets you deal with these edges with the Offset feature. To access the feature, do the following:
- Open the image to be edited
- Click on the Filter option of the main menu
- Choose Other from the Filter options
- Now choose Offset from Other
Once the Offset window opens up, you can make adjustments as per your need. The Offset window displays three sections:
- Horizontal
- Vertical
- Undefine Areas
For Horizontal and Vertical, you will have to increase the pixels. For the undefines areas choose Wrap Around. This step wraps the right edge around the left and the bottom around the top. This will bring the edges to the center of the window, making it easier to remove.
Offset by Repeating Texture
Another way of bringing the edges to the middle is by repeating the texture on the window. You first place the image to the bottom left corner of the window and then use the Move Tool to repeat the texture vertically on top. The shortcut to move the image is using Alt+Shift. Then use CTRL+E to merge these two. Next copy the texture and drag it to the top right corner. Again, use Alt+Shift to drag the texture to the bottom right. Merge all the edges. With this step completed, you will have all the edges in the middle, easily visible to the eyes, and easy to correct.
Patching the Joins
Now that you have done the offsetting, it is time to remove the visible edges from the center of the image to make it seamless. This also can be done in different ways. Let’s see what those are:
Applying The Clone Stamp Tool
The Tools window is where you find this option. Even easier, just click on the “S” button and your Clone Stamp tool is activated. This tool creates a replica of some part of the image and then this is painted over another area on the image. The next important step is choosing the right kind of brush. The brush you need will depend on how rough or smooth your texture is.
The standard round brush or anything that has soft edges is not recommended when trying to patch the joins. These round-edged brushes are not very efficient when it comes to hiding those edges. So, where do you look? Natural Brushes 2 can be a good choice. There are 3 chalk brushes here which work perfectly. You are also free to choose any brush from the Natural Brushes section.
If you have some experience with using brushes you might also like the options available in the Wet Media Brushes.
With the brush chosen, you will have to do the following:
- Set the size of the Brush
- Set the Mode as Normal
- Set Opacity somewhere in the range 50-85%. The lower values are generally preferred for soft textures, while the higher values work well for the rough textures.
- Make the Flow 100%
Choose a clean part of the image, free of any edges. With ALT+Left click you can now move your brush and paint over the ugly edges on your texture. This might need some practice to get good at. Once you learn it, you can have your seamless texture ready pretty quickly.
Applying the Spot Healing Tool
This is another tool you can use to get rid of those edges. The Tool Panel will have the Spot Healing Brush. Just like the Clone Stamp tool, you will have to choose the right brush in the Spot Healing tool. Then set the size of the brush and hardness you need based on the texture you are dealing with. Drag the brush over the horizontal and vertical edges and have them removed. This tool lets you remove all unwanted objects visible on the pattern. So, you can move the brush to all parts you want to be removed and have a seamless texture. This will also take some practice before you master the technique. Now with this tool, there is a chance that the texture will have some uneven patches. So, you can use the Clone Stamp tool to remove these patchy areas and have uniformity all over the image.
Save and Test
Once you have removed all the edges, you need to ensure your texture is seamless for further use. First, go to the main menu and choose Edit. Pick Define Pattern from here. Name your new texture and click OK to save it in the list of textures available on Photoshop. Time to test your creation! The best way to test is by creating a new blank layer using the “Create New Layer” option on the Layers Panel. You can also hit the button F7 to have a new layer. Now choose any single color and fill up the new layer. You can do this using the Paint Bucket option of the Tool panel.
Next, move to Layer in the main menu. Choose Layer Style followed by Pattern Overlay. The texture you produced will be right at the end of the list. Select it. This will fill up the new layer. Now drag around the layer to check if it is seamless throughout. Also, check the areas where the texture repeats. Scale down the size for a better view.
With this, your work is done. Your seamless texture is now ready to be practiced with any of your Photoshop jobs.