If you want to start working in Advance Steel, if you want to learn how to detail steel for steel production – this is tutorial for you. I am sharing entire process of making a Steel Platform used by CTA Chicago Transit Authority for maintenance. I will show you entire procedure from setting up a new project to making a final set of drawings and then also how to make revisions to your project. In this article I will show you how to create Levels in Advanced Steel.
This is not a standard Advance Steel project, but because of that I have decided to share it with you. Once you get the idea how to detail this Platform – making any other project will appear very easy.
Save this Pin to your Pinterest Advance Steel board:

Click on the video below to see step by step tutorial ho to create levels in Autodesk Advance Steel:
Here is the Completed Grid Project File for you to download for free.
Open Sample Project File
If you wish you can open sample Project File.
General Requirements
We have to make several levels to attach structural members to those levels. Advance Steel likes to associate structural members to particular levels. The Project is then well organized and you will have less problems in the future when doing that way.
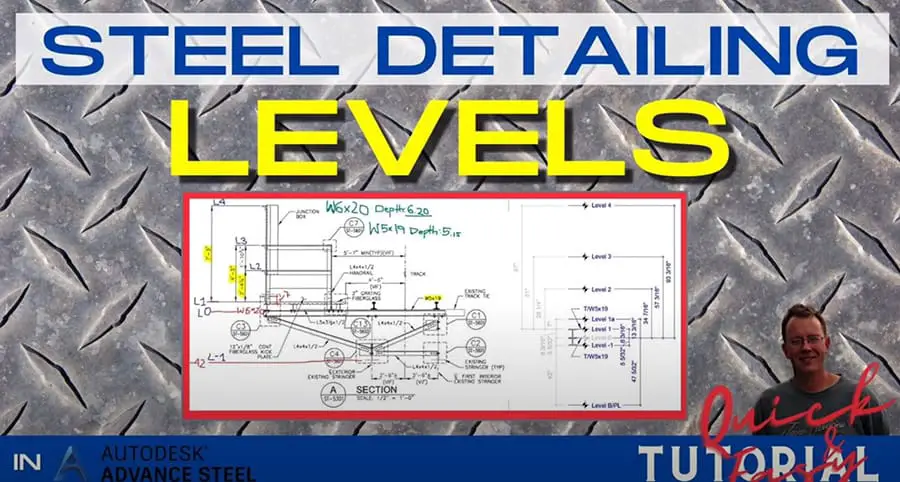
Please note that the height of the W6x20 beam is 6.2 inches and the height of the W5x19 beam is 5.15 inch.
Create First Level
Go to Home Tab, open Project Explorer and then click on Create Level above. It doesn’t matter that you don’t have any levels created yet.
The Create Level dialog box will open. Here you specify the parameters for your New Level. Since this is going to be our Level 0, I just hit OK.
Your new Level has been created. You can see new red level mark appeared in your drawing.
Adding More Layers Above
Let’s create more levels. Again go to Create New Level in Project Explorer.
Change the Altitude. Since this is going to be a top of my W6x20 I have inputted a number 6.2 inches into a dialog box. Hit OK.
Go to Create New Level in Project Explorer. Change the name to Level 1a. Change the Altitude to 13 3/16”, since our next level will be 7 inches above the last level. Hit OK.
As you see more levels in red are visible now in our drawing.
Hit Create New Level in Project Explorer. Change the name to Level 2. Change the Altitude to 34 7/8”. Hit OK. Your new layer will appear in the project.
Hit Create Level. Change the name to Level 3.
Change the Altitude to 57 3/16” above the Level 0. Hit OK. Level is in your Project.
Next hit Create New Level and change its name to Level 4.
Change the Altitude to 93 3/16”. Hit OK. Level is in your Project.
Adding Layers Below Level 0
Now let’s create levels Below the Level 0.
Press Create Level. Change on the top to Add Level Below. Change the name to Level -1.
Change the Altitude to -5 5/32”. Hit OK. You will see your level below the Level 0 in your Project.
Now create New Level. Call it Level B/PL since it will be Bottom of our Platform. Change the altitude to -47 5/32” below Level 0. Hit Enter.
All the required Levels are created for our project.
Making Adjustments To Layers
If you click on Front View in the View cube in the top right corner you will see all the created levels marked in red.
Now you can compare the initial drawing with our final drawing if they match. You can see the values in the Model Views in the Project Explorer.
Now if you want to make changes to your level Altitude because you made a mistake – simple click on the level you want to adjust, click Properties, change the Base Level to Level 0. Change the proper Altitude of the layer and hit OK. Your level will be adjusted to the proper height.
Now, you have all the required levels completed. In the next tutorial we will be creating beams for this project. Check it out!
The Entire Course Content:
Here is the entire course topic content by topic:
08 Adding Bolts To Custom Clip Angle Connection
12 Numbering Pieces And Assemblies
13 Creating Erection Drawings
14 Creating Shop Drawings
15 Making Revisions
16 Final Thoughts
My Toolbox
If you interested to see what am I using doing my daily work, check out My Toolbox post here.